左本Web3D 左本Web3D
首页
  • Cesium案例

    • 地形|模型加载,地图绘制测量 (opens new window)
    • 基于若依三维Gis可视化系统 (opens new window)
  • Mapbox案例

    • 养殖场模型渲染 (opens new window)
    • 近海阀式养殖 (opens new window)
  • Three案例

    • 学习案例
    • 网络案例,附源码地址
  • Three+D3

    • Demo | D3.js SVG Maps and Three.js (opens new window)
    • Demo | MapBox with D3.js and Three.js (opens new window)
  • 项目案例

    • 消防楼物联网三维可视化大屏
    • 智慧养殖三维可视化大屏
    • 智慧农田三维可视化大屏
    • 智慧城市运营管理平台
    • 智慧设备运维综合管理平台
    • 设备运维管理系统
    • 网格工具
    • 博物馆VR全景
    • 数字虚拟展厅
  • 在线访问

    • 网格工具 (opens new window)
    • 博物馆VR全景 (opens new window)
    • AI数字人 (opens new window)
    • 水厂3D可视化 (opens new window)
    • 3D地图 (opens new window)
  • 链接工具

    • Web3D相关链接
    • Gis相关链接
  • 小游戏

    • 吃什么? (opens new window)
CSDN (opens new window)
Gitee (opens new window)
GitHub (opens new window)
备用地址 (opens new window)

左本Web3D

专注Web3D技术领域
首页
  • Cesium案例

    • 地形|模型加载,地图绘制测量 (opens new window)
    • 基于若依三维Gis可视化系统 (opens new window)
  • Mapbox案例

    • 养殖场模型渲染 (opens new window)
    • 近海阀式养殖 (opens new window)
  • Three案例

    • 学习案例
    • 网络案例,附源码地址
  • Three+D3

    • Demo | D3.js SVG Maps and Three.js (opens new window)
    • Demo | MapBox with D3.js and Three.js (opens new window)
  • 项目案例

    • 消防楼物联网三维可视化大屏
    • 智慧养殖三维可视化大屏
    • 智慧农田三维可视化大屏
    • 智慧城市运营管理平台
    • 智慧设备运维综合管理平台
    • 设备运维管理系统
    • 网格工具
    • 博物馆VR全景
    • 数字虚拟展厅
  • 在线访问

    • 网格工具 (opens new window)
    • 博物馆VR全景 (opens new window)
    • AI数字人 (opens new window)
    • 水厂3D可视化 (opens new window)
    • 3D地图 (opens new window)
  • 链接工具

    • Web3D相关链接
    • Gis相关链接
  • 小游戏

    • 吃什么? (opens new window)
CSDN (opens new window)
Gitee (opens new window)
GitHub (opens new window)
备用地址 (opens new window)
  • 技术文档

    • Git使用手册
    • Markdown使用教程
    • npm常用命令
    • npm packageJson属性详解
    • yaml语言教程
  • GitHub技巧

    • GitHub高级搜索技巧
    • GitHub Actions 实现自动部署静态博客
    • GitHub Actions 定时运行代码:每天定时百度链接推送
    • GitHub加速下载项目的方法
  • Nodejs

    • nodejs递归读取所有文件
  • 博客搭建

    • 解决百度无法收录搭建在GitHub上的个人博客的问题
    • 使用Gitalk实现静态博客无后台评论系统
      • 前言
      • 准备
      • 实现
        • 安装
        • 使用
        • BUG修复
    • GitHub + jsDelivr + TinyPNG+ PicGo 打造稳定快速、高效免费图床
    • vdoing主题效果图
  • 技术
  • 博客搭建
xugaoyi
2019-12-25
目录

使用Gitalk实现静态博客无后台评论系统

# 使用Gitalk实现静态博客无后台评论系统

# 前言

Gitalk,一个基于 Github Issue 和 Preact 开发的评论插件。

下面我们来用它在vuepress搭建的博客中搭建评论区吧

# 准备

使用一个新的东西首先当然是要了解它

Gitalk demo:https://gitalk.github.io/ (opens new window)

Gitalk github:https://github.com/gitalk/gitalk (opens new window)

# 实现

如何实现?最好的方法我认为是看官方文档 (opens new window),这里我只是记录一下实现的步骤。

使用一个别人已经开发好的 vuepress-plugin-comment (opens new window) 插件来帮助我们把Gitalk应用到vuepress搭建的静态博客。

# 安装

npm install --save vuepress-plugin-comment
1

# 使用

options的配置和Gitalk的配置相同

module.exports = {
  plugins: [
    [
      'vuepress-plugin-comment',
      {
        choosen: 'gitalk', 
        options: {
          clientID: 'GitHub Application Client ID',
          clientSecret: 'GitHub Application Client Secret',
          repo: 'GitHub repo',
          owner: 'GitHub repo owner',
          admin: ['GitHub repo owner and collaborators, only these guys can initialize github issues'],
          distractionFreeMode: false 
        }
      }
    ]
  ]
}
1
2
3
4
5
6
7
8
9
10
11
12
13
14
15
16
17
18

需要 GitHub Application,如果没有 点击这里申请 (opens new window),Authorization callback URL 填写当前使用插件页面的域名。

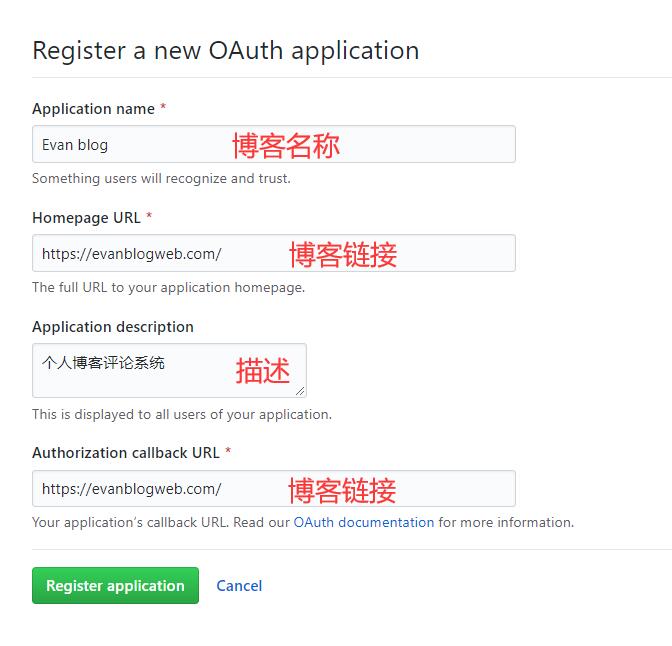
申请完成就会得 Client ID 和 Client Secret。然后把对应参数填写到配置中,例:

module.exports = {
  plugins: [
    [
      'vuepress-plugin-comment',
      {
        choosen: 'gitalk', 
        options: {
          clientID: 'a6e*******4709b88b',
          clientSecret: 'f0e***************beb8b2d54d7241',
          repo: 'blog', // GitHub 仓库
          owner: 'xugaoyi', // GitHub仓库所有者
          admin: ['xugaoyi'], // 对仓库有写权限的人
          distractionFreeMode: false 
        }
      }
    ]
  ]
}
1
2
3
4
5
6
7
8
9
10
11
12
13
14
15
16
17
18

配置好之后重启项目就发现页面上多了一个评论区,说明评论功能实现啦。但还是有一些bug,继续完善它~

# BUG修复

评论区与博客样式不匹配

解决办法:新增全局样式文件.vuepress/styles/index.styl,写入样式

#vuepress-plugin-comment
  max-width $contentWidth
  margin 0 auto
  padding 2rem 2.5rem
  @media (max-width: $MQNarrow)
    padding 2rem
  @media (max-width: $MQMobileNarrow)
    padding 1.5rem
1
2
3
4
5
6
7
8

评论区出现 Error: Validation Failed.

问题分析:当页面 链接过长 或 存在中文链接,导致整个链接字符串长度超过50时,会造成请求issues接口失败,出现422状态码。(中文链接会自动转码,变得很长,id参数默认取的是链接,长度不能超过50)

解决办法:手动设置id取值,限制长度不超过50。

{
 choosen: 'gitalk', 
 options: {
   ...
   id: "<%- (window.location.origin + (frontmatter.to.path || window.location.pathname)).slice(-50) %>", //  页面的唯一标识,长度不能超过50
   title: "「评论」<%- document.title %>", // GitHub issue 的标题
   labels: ["Gitalk", "Comment"], // GitHub issue 的标签
   body:"<%- document.title %>:<%- window.location.origin + (frontmatter.to.path || window.location.pathname) %>" // GitHub issue 的内容
 }
}
1
2
3
4
5
6
7
8
9
10

访问变量时,如 $frontmatter 或 window等,请使用 EJS 语法。因为在配置中不能使用回调函数,会被vuepress过滤,因此使用 EJS 语法。 ——插件作者文档说明

切换页面后评论区内容还是上一个页面的评论

解决:id在获取path时使用 frontmatter.to.path,插件内置了 ``frontmatter.from、frontmatter.to`。

{
 choosen: 'gitalk', 
 options: {
   ...
   id: "<%- (window.location.origin + (frontmatter.to.path || window.location.pathname)).slice(-50) %>", //  页面的唯一标识,长度不能超过50
   title: "「评论」<%- document.title %>", // GitHub issue 的标题
   labels: ["Gitalk", "Comment"], // GitHub issue 的标签
   body:"<%- document.title %>:<%- window.location.origin + (frontmatter.to.path || window.location.pathname) %>" // GitHub issue 的内容
 }
}
1
2
3
4
5
6
7
8
9
10
上次更新: 2023/08/25, 16:22:35
解决百度无法收录搭建在GitHub上的个人博客的问题
GitHub + jsDelivr + TinyPNG+ PicGo 打造稳定快速、高效免费图床

← 解决百度无法收录搭建在GitHub上的个人博客的问题 GitHub + jsDelivr + TinyPNG+ PicGo 打造稳定快速、高效免费图床→

最近更新
01
我做了一个手写春联小网页,祝大家虎年暴富 原创
01-28
02
一行代码“黑”掉任意网站 原创
11-25
03
33个非常实用的JavaScript一行代码
11-02
更多文章>
Theme by Vdoing | Copyright © 2023-2025 左本
  • 跟随系统
  • 浅色模式
  • 深色模式
  • 阅读模式